Rfe 009:工程师之Rust绘图-PPM格式
Rust绘图-PPM格式
整了各种计算,最后还得给人看结果。要是Matlab和Python那就太自然了,Rust咋办?当然是自己写个绘图库啦!我们当然从最简单的PPM格式开始,毕竟这是最简单的图像格式了,直接用文本就能表示。
PPM格式简介
PPM(Portable Pixmap Format)是一种简单的图像文件格式,属于Netpbm格式家族。PPM文件以纯文本形式存储图像数据,包含了图像的宽度、高度、最大颜色值以及每个像素的RGB颜色值。PPM格式非常适合初学者,因为它易于理解和实现。
PPM文件的结构如下:
P3
# 这是一个PPM文件的注释
宽度 高度
最大颜色值
R G B R G B R G B ...
这个P3表示文本格式也就是下面的RGB是数值对应的字符,这里也能设为P6,表示二进制格式,后面的颜色就是8个bits一个,一个点就是24bits,稍微节省一点点硬盘空间。这么一个东西有什么用呢?我们先不管,先看看如何用Rust来表示一个PPM图像。
从上面的描述可以很容易看出,我们的PPM包括几个信息:
- 宽度
- 高度
- 最大颜色值
- 每个像素点的RGB颜色值(宽度 * 高度个像素点)
那么在Rust中,我们可以定义一个结构体来表示PPM图像:
1struct Ppm {
2    width: u32,
3    height: u32,
4    max_color_value: u32,
5    pixels: Vec<(u8, u8, u8)>, // 每个像素点的RGB颜色值
6}
再仔细考虑一下,还可以考虑把一个像素点的RGB颜色值单独定义为一个结构体,这样代码会更清晰:
1struct Pixel {
2    r: u8,
3    g: u8,
4    b: u8,
5}
相应地,我们的PPM结构体可以改为:
1struct Ppm {
2    width: u32,
3    height: u32,
4    max_color_value: u32,
5    pixels: Vec<Pixel>, // 每个像素点的RGB颜色值
6}
相应的,我们也很容易实现创建一个PPM图像的方法:
 1impl Ppm {
 2    fn new(width: u32, height: u32, max_color_value: u32) -> Self { // 创建一个全黑的PPM图像
 3        let pixels = vec![Pixel { r: 0, g: 0, b: 0 }; (width * height) as usize];
 4        Ppm {
 5            width,
 6            height,
 7            max_color_value,
 8            pixels,
 9        }
10    }
11}
实际上,rust还提供了很方便的lambda表达式来创建一个PPM图像:
 1
 2impl Ppm {
 3    fn new_with_fn<F>(width: u32, height: u32, max_color_value: u32, f: F) -> Self
 4    where
 5        F: Fn(u32, u32) -> Pixel,
 6    {
 7        let pixels = (0..height)
 8            .flat_map(|y| (0..width).map(move |x| f(x, y)))
 9            .collect();
10        Ppm {
11            width,
12            height,
13            max_color_value,
14            pixels,
15        }
16    }
17}
大概就是类似的东西,调用就非常方便:
1fn main() {
2    let ppm = Ppm::new_with_fn(800, 600, 255, |x, y| {
3        Pixel {
4            r: (x % 256) as u8,
5            g: (y % 256) as u8,
6            b: ((x + y) % 256) as u8,
7        }
8    });
9}
文件操作
那么我们还需要一个方法来将PPM图像保存为文件。我们可以使用Rust的标准库中的std::fs::File和std::io::Write来实现这个功能:
  1use std::{
  2    fs::File,
  3    io::{self, BufRead, BufReader, Write},
  4    path::Path,
  5};
  6
  7#[derive(Debug, Clone, Copy, PartialEq, Eq)]
  8struct Pixel {
  9    r: u8,
 10    g: u8,
 11    b: u8,
 12}
 13
 14#[derive(Debug, Clone, PartialEq, Eq)]
 15struct Ppm {
 16    width: u32,
 17    height: u32,
 18    max_color_value: u32,
 19    pixels: Vec<Pixel>,
 20}
 21
 22impl Ppm {
 23    fn new(width: u32, height: u32, max_color_value: u32) -> Self {
 24        let total = width
 25            .checked_mul(height)
 26            .expect("width * height overflow");
 27
 28        Self {
 29            width,
 30            height,
 31            max_color_value,
 32            pixels: vec![Pixel { r: 0, g: 0, b: 0 }; total as usize],
 33        }
 34    }
 35
 36    fn new_with_fn<F>(width: u32, height: u32, max_color_value: u32, f: F) -> Self
 37    where
 38        F: Fn(u32, u32) -> Pixel,
 39    {
 40        let pixels = (0..height)
 41            .flat_map(|y| (0..width).map(move |x| f(x, y)))
 42            .collect();
 43
 44        Self {
 45            width,
 46            height,
 47            max_color_value,
 48            pixels,
 49        }
 50    }
 51
 52    fn save_to_file<P: AsRef<Path>>(&self, path: P) -> io::Result<()> {
 53        let mut file = File::create(path)?;
 54
 55        writeln!(file, "P3")?;
 56        writeln!(file, "{} {}", self.width, self.height)?;
 57        writeln!(file, "{}", self.max_color_value)?;
 58
 59        for pixel in &self.pixels {
 60            write!(file, "{} {} {} ", pixel.r, pixel.g, pixel.b)?;
 61        }
 62        writeln!(file)?;
 63
 64        Ok(())
 65    }
 66
 67    fn from_ppm_file<P: AsRef<Path>>(path: P) -> io::Result<Self> {
 68        let file = File::open(path)?;
 69        let reader = BufReader::new(file);
 70
 71        let mut tokens = Vec::new();
 72        for line in reader.lines() {
 73            let line = line?;
 74            let content = line.split('#').next().unwrap_or(&line);
 75            tokens.extend(content.split_whitespace());
 76        }
 77
 78        let mut iter = tokens.into_iter();
 79
 80        let magic = next_token(&mut iter, "Missing magic")?;
 81        if magic != "P3" {
 82            return Err(io::Error::new(
 83                io::ErrorKind::InvalidData,
 84                format!("Invalid PPM format: expected P3, got {magic}"),
 85            ));
 86        }
 87
 88        let width = parse_u32(next_token(&mut iter, "Missing width")?, "width")?;
 89        let height = parse_u32(next_token(&mut iter, "Missing height")?, "height")?;
 90        let max_color_value =
 91            parse_u32(next_token(&mut iter, "Missing max color value")?, "max color value")?;
 92
 93        if max_color_value > 255 {
 94            return Err(io::Error::new(
 95                io::ErrorKind::InvalidData,
 96                "PPM max color value must be <= 255 for this parser",
 97            ));
 98        }
 99
100        let pixel_count = width
101            .checked_mul(height)
102            .ok_or_else(|| io::Error::new(io::ErrorKind::InvalidData, "Image dimensions overflow"))?
103            as usize;
104
105        let mut pixels = Vec::with_capacity(pixel_count);
106        for _ in 0..pixel_count {
107            let r = parse_u8(next_token(&mut iter, "Missing red value")?, "red value")?;
108            let g = parse_u8(next_token(&mut iter, "Missing green value")?, "green value")?;
109            let b = parse_u8(next_token(&mut iter, "Missing blue value")?, "blue value")?;
110            pixels.push(Pixel { r, g, b });
111        }
112
113        if iter.next().is_some() {
114            return Err(io::Error::new(
115                io::ErrorKind::InvalidData,
116                "Unexpected trailing data in PPM file",
117            ));
118        }
119
120        Ok(Self {
121            width,
122            height,
123            max_color_value,
124            pixels,
125        })
126    }
127}
128
129fn next_token<'a>(
130    iter: &mut impl Iterator<Item = &'a str>,
131    field: &str,
132) -> io::Result<&'a str> {
133    iter.next().ok_or_else(|| {
134        io::Error::new(io::ErrorKind::InvalidData, format!("Missing {field}"))
135    })
136}
137
138fn parse_u32(value: &str, field: &str) -> io::Result<u32> {
139    value.parse().map_err(|_| {
140        io::Error::new(
141            io::ErrorKind::InvalidData,
142            format!("Invalid {field}: {value}"),
143        )
144    })
145}
146
147fn parse_u8(value: &str, field: &str) -> io::Result<u8> {
148    value.parse().map_err(|_| {
149        io::Error::new(
150            io::ErrorKind::InvalidData,
151            format!("Invalid {field}: {value}"),
152        )
153    })
154}
“解析文件、校验数据、保存文件”,其实读比写容易多了,毕竟一张白纸好作画,而读别人的文件,到处都是坑……上面的代码里还顺手处理了 PPM 里常见的注释行,这样就更稳一点。
PPM可以用来干什么?
说白了,PPM 这种格式最拿手的就是“简单、直接、好读写”。它不追求高级压缩,也不讲究复杂特性,但正因为它足够朴实,所以很适合拿来做实验、教学和原型。
- 图像处理和计算机视觉:PPM 很适合拿来当图像算法的输入输出。你可以拿它来试试滤波、边缘检测、图像分割这些东西,简单直接,调试也方便。
- 教育和学习:它真的是个很好的入门材料。学生自己写一段代码生成图像、读图像、改颜色,能更直观看懂图像处理的基本思路。
- 图像生成:PPM 也能拿来生成简单图像,比如几何图形、渐变色、噪声图之类的,不需要太复杂的库,直接写文件就能看效果。
- 跨平台交换:因为它本质上是纯文本,放到不同系统、不同语言里都比较容易处理。你拿着它传图像数据,基本不会遇到太多兼容问题。
- 调试和测试:在做图像处理程序的时候,PPM 经常被拿来当“最小测试样例”。你生成一张图,再看输出结果,能快速判断算法是不是出问题。
当然了,PPM 也不是拿来做大工程的主力格式。它文件会比较大,而且没有压缩,像 JPEG、PNG 这种格式更适合真正的生产环境。不过在学习、原型和研究场景里,PPM 还是很有价值的,特别是拿来搞抽象、整玩具。
一个AA算法的例子
当然,上面的无聊代码我也写了一个crate,放在rust-ppm上了,可以随便直接用。
1    let image = Image::from_pixel_fn(256, 256, |x, y| Pixel::rgb(x as u8, y as u8, 200));
2
3    image.save("gradient.ppm")?;
一句话产生一个PPM图像,我们按照from_pixel_fn的方式,传入一个闭包函数,闭包函数的参数是像素点的坐标,返回值是这个像素点的颜色值。
我们产生了一个gradient.ppm文件,可以用任何支持PPM格式的图像查看器打开,比如GIMP、IrfanView、XnView等,或者用ImageMagick的convert命令行工具将其转换为其他格式(如PNG、JPEG等)。
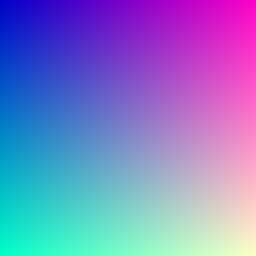
下面,我们再演示如何画一个圆形,结果保存在:circle.ppm。
 1    const SIZE: usize = 320;
 2
 3    let image2 = Image::from_pixel_fn(SIZE, SIZE, |x, y| {
 4        // same thickness semantics as the AA version: ring width is defined by
 5        // distance from the ideal radius, not by a squared-distance hack.
 6        let center_x = SIZE as f32 / 2.0;
 7        let center_y = SIZE as f32 / 2.0;
 8        let radius = SIZE as f32 / 2.0 - 10.0;
 9        let thickness = radius * 0.01;
10
11        let dx = x as f32 - center_x;
12        let dy = y as f32 - center_y;
13        let distance = (dx * dx + dy * dy).sqrt();
14        let d = (distance - radius).abs();
15
16        if d <= thickness / 2.0 {
17            Pixel::rgb(255, 0, 0)
18        } else {
19            Pixel::rgb(255, 255, 255)
20        }
21    });
22
23    image2.save("circle.ppm")?;
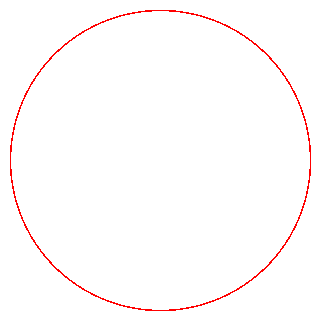
很明显的锯齿……我们增加所谓的抗锯齿(Anti-Aliasing,简称AA)算法,来改善这个问题。抗锯齿的基本思路是通过对像素点进行采样和混合,使得边缘过渡更加平滑,从而减少锯齿现象。
 1    // Anti-aliased circular outline: a ring with a controllable line thickness.
 2    let image3 = Image::from_pixel_fn(SIZE, SIZE, |x, y| {
 3        let center_x = SIZE as f32 / 2.0;
 4        let center_y = SIZE as f32 / 2.0;
 5        let radius = SIZE as f32 / 2.0 - 10.0;
 6        let thickness = radius * 0.01;
 7
 8        let dx = x as f32 - center_x;
 9        let dy = y as f32 - center_y;
10        let distance = (dx * dx + dy * dy).sqrt();
11
12        // ring thickness is measured as the distance from the ideal circle radius
13        let d = (distance - radius).abs();
14        let coverage = 1.0 - (d - thickness / 2.0 + 0.5).clamp(0.0, 1.0);
15        let background: [u8; 3] = [255_u8, 255_u8, 255_u8];
16        let foreground: [u8; 3] = [255_u8, 0_u8, 0_u8];
17        let [bg_r, bg_g, bg_b] = background;
18        let [fg_r, fg_g, fg_b] = foreground;
19
20        Pixel::rgb(
21            blend_u8(bg_r, fg_r, coverage),
22            blend_u8(bg_g, fg_g, coverage),
23            blend_u8(bg_b, fg_b, coverage),
24        )
25    });
26
27    image3.save("circle_aa_outline.ppm")?;
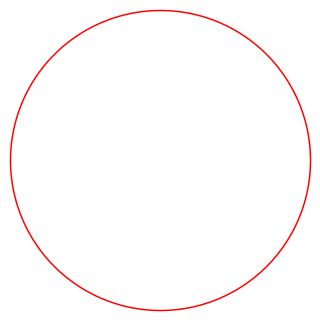
这里我们增加了一个混合函数,大大改善了渲染的结果。
1fn blend_u8(background: u8, foreground: u8, alpha: f32) -> u8 {
2    (background as f32 * (1.0 - alpha) + foreground as f32 * alpha).round() as u8
3}
当然,我们还可以用更加复杂的采样算法来进一步改善抗锯齿效果,比如多重采样(MSAA)、超采样(SSAA)等。通过增加采样点的数量和优化采样策略,可以获得更平滑的边缘和更高质量的图像。
 1    // Higher-quality anti-aliased outline using supersampling.
 2    // Same geometry as the existing examples for a clean comparison.
 3    let image4 = Image::from_pixel_fn(SIZE, SIZE, |x, y| {
 4        let center_x = SIZE as f32 / 2.0;
 5        let center_y = SIZE as f32 / 2.0;
 6        let radius = SIZE as f32 / 2.0 - 10.0;
 7        let thickness = radius * 0.01;
 8
 9        let coverage = supersample_ring_coverage(x, y, center_x, center_y, radius, thickness, 4);
10        let background: [u8; 3] = [255_u8, 255_u8, 255_u8];
11        let foreground: [u8; 3] = [255_u8, 0_u8, 0_u8];
12        let [bg_r, bg_g, bg_b] = background;
13        let [fg_r, fg_g, fg_b] = foreground;
14
15        Pixel::rgb(
16            blend_u8(bg_r, fg_r, coverage),
17            blend_u8(bg_g, fg_g, coverage),
18            blend_u8(bg_b, fg_b, coverage),
19        )
20    });
21
22    image4.save("circle_aa_super.ppm")?;
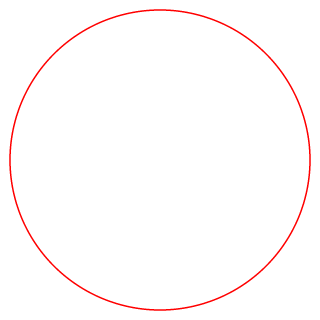
对于这个简单无聊的例子,我已经看不出区别了……但是合格真的还是挺好玩的……
完整的代码
  1use rust_ppm::{Image, Pixel};
  2
  3fn blend_u8(background: u8, foreground: u8, alpha: f32) -> u8 {
  4    (background as f32 * (1.0 - alpha) + foreground as f32 * alpha).round() as u8
  5}
  6
  7fn supersample_ring_coverage(
  8    x: usize,
  9    y: usize,
 10    center_x: f32,
 11    center_y: f32,
 12    radius: f32,
 13    thickness: f32,
 14    samples: usize,
 15) -> f32 {
 16    let mut inside = 0usize;
 17    let step = 1.0 / samples as f32;
 18
 19    for sub_y in 0..samples {
 20        for sub_x in 0..samples {
 21            let px = x as f32 + (sub_x as f32 + 0.5) * step;
 22            let py = y as f32 + (sub_y as f32 + 0.5) * step;
 23            let dx = px - center_x;
 24            let dy = py - center_y;
 25            let distance = (dx * dx + dy * dy).sqrt();
 26            let d = (distance - radius).abs();
 27
 28            if d <= thickness / 2.0 {
 29                inside += 1;
 30            }
 31        }
 32    }
 33
 34    inside as f32 / (samples * samples) as f32
 35}
 36
 37fn main() -> std::io::Result<()> {
 38    let image = Image::from_pixel_fn(256, 256, |x, y| Pixel::rgb(x as u8, y as u8, 200));
 39
 40    image.save("gradient.ppm")?;
 41
 42    const SIZE: usize = 320;
 43
 44    let image2 = Image::from_pixel_fn(SIZE, SIZE, |x, y| {
 45        // same thickness semantics as the AA version: ring width is defined by
 46        // distance from the ideal radius, not by a squared-distance hack.
 47        let center_x = SIZE as f32 / 2.0;
 48        let center_y = SIZE as f32 / 2.0;
 49        let radius = SIZE as f32 / 2.0 - 10.0;
 50        let thickness = radius * 0.01;
 51
 52        let dx = x as f32 - center_x;
 53        let dy = y as f32 - center_y;
 54        let distance = (dx * dx + dy * dy).sqrt();
 55        let d = (distance - radius).abs();
 56
 57        if d <= thickness / 2.0 {
 58            Pixel::rgb(255, 0, 0)
 59        } else {
 60            Pixel::rgb(255, 255, 255)
 61        }
 62    });
 63
 64    image2.save("circle.ppm")?;
 65
 66    // Anti-aliased circular outline: a ring with a controllable line thickness.
 67    let image3 = Image::from_pixel_fn(SIZE, SIZE, |x, y| {
 68        let center_x = SIZE as f32 / 2.0;
 69        let center_y = SIZE as f32 / 2.0;
 70        let radius = SIZE as f32 / 2.0 - 10.0;
 71        let thickness = radius * 0.01;
 72
 73        let dx = x as f32 - center_x;
 74        let dy = y as f32 - center_y;
 75        let distance = (dx * dx + dy * dy).sqrt();
 76
 77        // ring thickness is measured as the distance from the ideal circle radius
 78        let d = (distance - radius).abs();
 79        let coverage = 1.0 - (d - thickness / 2.0 + 0.5).clamp(0.0, 1.0);
 80        let background: [u8; 3] = [255_u8, 255_u8, 255_u8];
 81        let foreground: [u8; 3] = [255_u8, 0_u8, 0_u8];
 82        let [bg_r, bg_g, bg_b] = background;
 83        let [fg_r, fg_g, fg_b] = foreground;
 84
 85        Pixel::rgb(
 86            blend_u8(bg_r, fg_r, coverage),
 87            blend_u8(bg_g, fg_g, coverage),
 88            blend_u8(bg_b, fg_b, coverage),
 89        )
 90    });
 91
 92    image3.save("circle_aa_outline.ppm")?;
 93
 94    // Higher-quality anti-aliased outline using supersampling.
 95    // Same geometry as the existing examples for a clean comparison.
 96    let image4 = Image::from_pixel_fn(SIZE, SIZE, |x, y| {
 97        let center_x = SIZE as f32 / 2.0;
 98        let center_y = SIZE as f32 / 2.0;
 99        let radius = SIZE as f32 / 2.0 - 10.0;
100        let thickness = radius * 0.01;
101
102        let coverage = supersample_ring_coverage(x, y, center_x, center_y, radius, thickness, 4);
103        let background: [u8; 3] = [255_u8, 255_u8, 255_u8];
104        let foreground: [u8; 3] = [255_u8, 0_u8, 0_u8];
105        let [bg_r, bg_g, bg_b] = background;
106        let [fg_r, fg_g, fg_b] = foreground;
107
108        Pixel::rgb(
109            blend_u8(bg_r, fg_r, coverage),
110            blend_u8(bg_g, fg_g, coverage),
111            blend_u8(bg_b, fg_b, coverage),
112        )
113    });
114
115    image4.save("circle_aa_super.ppm")?;
116
117    Ok(())
118}
文章标签
|-->rust |-->rfe |-->ppm |-->绘图
- 本站总访问量:loading次
- 本站总访客数:loading人
- 可通过邮件联系作者:Email大福
- 也可以访问技术博客:大福是小强
- 也可以在知乎搞抽象:知乎-大福
- Comments, requests, and/or opinions go to: Github Repository
