Egui First Try 使用Rust开发一个简单的UI
Why
我用Git有一些时间,不过一直是单线git flow,所有的库都是从master/main上拉取,直接在master/main上开发,然后push到远程仓库。因为我的Github Pages是基于Github Actions自动部署的,每次main分支有push,就会自动部署。这个功能一直运行得很好,在前面我写文章的过程中,我一直有一个很不好的感觉,就是commit之后,对推送(附带的Github Actions)有很强的抗拒,总觉得也没给钱而且用了计算时间就相当于排放了二氧化碳。
直到今天,我突然意识到,我可以随便push,只要我checkout到其他分支!这也是为什么Git的分支为什么那么轻,因为Git鼓励多用分支,把所有的工作都正交化。作为一个老年人,我为自己骄傲……我居然还天天都有进步!总之,进步的空间还有很大。
当然我也可能不承认我居然这么笨……我就说我就喜欢用master/main……绝不承认是我没有意识到,用分支工作是git的设计意图。
![]()
《The Checklist Manifesto》
这是一本我很喜欢的书,作者是Atul Gawande,他是一位外科医生,也是一位作家。这本书是关于医疗领域的,但是我觉得在软件开发领域,这本书同样适用。

这本书的副标题是:How to Get Things Done That Matter,中文翻译为《清单革命》微信读书。
我马上(大概4个小时)就制定了一个清单,GitHub Pages文章发布清单!
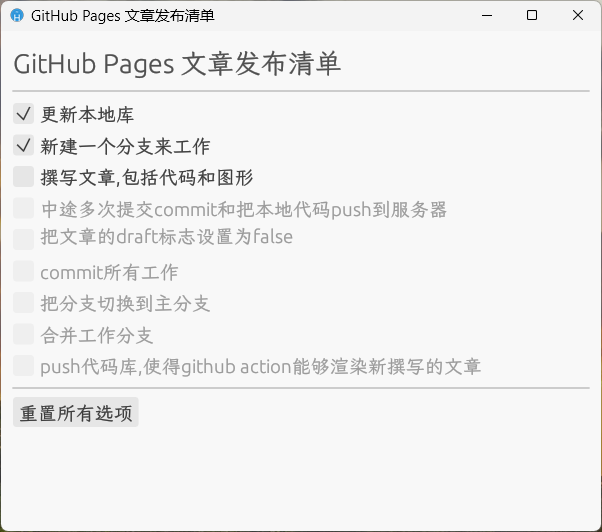
一定每次都更新本地文件,新建分支,……
最重要的是,要把文章的draft改为false,然后再合并分支,推送到远程仓库。
又是不做领域专家的一天
今天根本没有评审、也不需要开会,那当然就是R神启动的一天。
既然需求都那么清楚,当然是编个小程序,顺便看看Rust写界面怎么样。
我倒是在wsl上编译了一个,感觉不太靠谱的样子,回家在Ubuntu上试一下。
总体感觉:
- 单文件发布感觉非常爽;
- 程序的尺寸在合理的范围,就这个没啥功能的玩意,只有5MB多;
- 编写过程非常流畅;
- windows和wsl都能很容易编译,感觉非常棒;
- R神启动,感觉非常爽!
使用Egui
egui是一个将近有2.5万star的Rust> UI库,我也没仔细看,就随便tab,tab,tab一路下来。
有空把代码好好看看,下次一定……下次一定……
UI设计
因为这个需求和内容过于简单,我把主要精力放在了小清新上。
- 使用了小清新开源字体:霞鹜文楷
- 下载字体文件
- 使用了自行设计的清新ICon
- 界面的风格很清新
字体裁剪
因为我们想要的是单一的exe,所以需要裁剪字体。我们用的是pyftsubset,这是一个字体工具,可以用来裁剪字体。编了一个脚本,把我们所需要的字符裁剪出来。
 1import os
 2import re
 3import subprocess
 4import sys
 5from pathlib import Path
 6
 7
 8def extract_chinese_chars():
 9    """从 text.rs 文件中提取所有中文字符"""
10    try:
11        # 获取项目根目录
12        project_root = Path(__file__).parent.parent
13        text_rs_path = project_root / "src" / "text.rs"
14
15        # 读取 text.rs 文件
16        with open(text_rs_path, "r", encoding="utf-8") as f:
17            content = f.read()
18
19        # 使用正则表达式提取所有中文字符
20        chinese_chars = re.findall(r'[\u4e00-\u9fff]', content)
21
22        # 去重并排序
23        chinese_chars = sorted(set(chinese_chars))
24
25        # 将字符列表转换为字符串
26        chars_str = "".join(chinese_chars)
27
28        print(f"成功读取 text.rs,提取到 {len(chinese_chars)} 个中文字符")
29        return chars_str
30
31    except Exception as e:
32        print(f"错误:{e}")
33        sys.exit(1)
34
35
36def create_font_subset(chars):
37    """创建字体子集"""
38    project_root = Path(__file__).parent.parent
39    font_path = project_root / "fonts" / "霞鹜文楷.ttf"
40    output_path = project_root / "fonts" / "custom_font.ttf"
41
42    # 检查源字体文件是否存在
43    if not font_path.exists():
44        print(f"错误:字体文件不存在:{font_path}")
45        sys.exit(1)
46
47    print("开始创建字体子集...")
48    try:
49        # 使用 pyftsubset 创建字体子集
50        subprocess.run([
51            "pyftsubset",
52            str(font_path),
53            f"--text={chars}",
54            "--output-file=" + str(output_path),
55            "--no-hinting",
56            "--desubroutinize",
57            "--no-recommended-glyphs",
58            "--layout-features=*",
59            "--glyph-names",
60            "--symbol-cmap",
61            "--legacy-cmap",
62            "--notdef-glyph",
63            "--notdef-outline",
64            "--recommended-glyphs",
65            "--name-IDs=*",
66            "--name-legacy",
67            "--name-languages=*"
68        ], check=True)
69
70        print(f"字体子集创建成功:{output_path}")
71
72    except Exception as e:
73        print(f"创建字体子集失败:{e}")
74        sys.exit(1)
75
76
77def main():
78    print("开始处理...")
79
80    # 提取中文字符
81    chars = extract_chinese_chars()
82
83    # 创建字体子集
84    create_font_subset(chars)
85
86    print("处理完成!")
87
88
89if __name__ == "__main__":
90    main()
为了裁剪方便,我们把程序中的所有文字都放在一个mod中定义:
 1pub const WINDOW_TITLE: &str = "GitHub Pages 文章发布清单";
 2pub const HEADING: &str = "GitHub Pages 文章发布清单";
 3pub const RESET_BUTTON: &str = "重置所有选项";
 4
 5pub const CHECKLIST_ITEMS: &[&str] = &[
 6    "更新本地库",
 7    "新建一个分支来工作",
 8    "撰写文章,包括代码和图形",
 9    "中途多次提交commit和把本地代码push到服务器",
10    "把文章的draft标志设置为false",
11    "commit所有工作",
12    "把分支切换到主分支",
13    "合并工作分支",
14    "push代码库,使得github action能够渲染新撰写的文章",
15];
16
17// 获取所有需要包含在字体中的字符
18// pub fn get_all_chars() -> String {
19//     let mut chars = String::new();
20//
21//     // 添加标题
22//     chars.push_str(WINDOW_TITLE);
23//     chars.push_str(HEADING);
24//     chars.push_str(RESET_BUTTON);
25//
26//     // 添加所有清单项
27//     for item in CHECKLIST_ITEMS {
28//         chars.push_str(item);
29//     }
30//
31//     // 去重并排序
32//     let mut chars: Vec<char> = chars.chars().collect();
33//     chars.sort();
34//     chars.dedup();
35//
36//     chars.into_iter().collect()
37// }
本来我还想整理一下,就是被注释掉的那点代码,后来感觉没有太大收益就算了。
这个Python基本产生一个文件custom_font.ttf,然后就可以用这个字体了。
在程序中,我们用了一个宏include_bytes!,直接把字体文件嵌入到exe中。
1            fonts.font_data.insert(
2                "custom_font".to_owned(),
3                egui::FontData::from_static(include_bytes!("../fonts/custom_font.ttf")),
4            );
Icon生成
虽然可以在网上下载一个Icon但是,这样不够小清新,我决定用Python生成一个。
  1from PIL import Image, ImageDraw, ImageFont
  2from pathlib import Path
  3import struct
  4import io
  5
  6
  7def create_icon_for_size(size):
  8    """为特定尺寸创建优化的图标"""
  9    # 创建一个新的图像
 10    image = Image.new('RGBA', (size, size), (0, 0, 0, 0))
 11    draw = ImageDraw.Draw(image)
 12
 13    # 计算边距,确保在小尺寸时也有足够的空间
 14    margin = max(2, size // 10)  # 至少2像素的边距,或者10%的边距
 15    circle_bbox = [margin, margin, size - margin, size - margin]
 16
 17    # 绘制背景圆形
 18    draw.ellipse(circle_bbox, fill=(52, 152, 219))
 19
 20    # 根据尺寸调整字体大小
 21    font_size = int(size * 0.6)  # 字体占整个图标的60%
 22    try:
 23        font = ImageFont.truetype("arial.ttf", font_size)
 24    except:
 25        font = ImageFont.load_default()
 26        font_size = int(size * 0.4)  # 默认字体需要更小一些
 27
 28    # 绘制文字 "H"
 29    text = "H"
 30    text_bbox = draw.textbbox((0, 0), text, font=font)
 31    text_width = text_bbox[2] - text_bbox[0]
 32    text_height = text_bbox[3] - text_bbox[1]
 33
 34    # 将H向下移动一点,为波浪号腾出空间
 35    x = (size - text_width) // 2
 36    y = (size - text_height) // 2 + text_height // 6  # 向下移动一点
 37
 38    draw.text((x, y), text, fill=(255, 255, 255), font=font)
 39
 40    # 添加波浪号
 41    wave_font_size = int(font_size * 0.5)  # 波浪号大小为H的一半
 42    try:
 43        wave_font = ImageFont.truetype("arial.ttf", wave_font_size)
 44    except:
 45        wave_font = ImageFont.load_default()
 46        wave_font_size = int(size * 0.2)
 47
 48    wave = "~"
 49    wave_bbox = draw.textbbox((0, 0), wave, font=wave_font)
 50    wave_width = wave_bbox[2] - wave_bbox[0]
 51    wave_height = wave_bbox[3] - wave_bbox[1]
 52
 53    wave_x = (size - wave_width) // 2
 54    wave_y = y - text_height // 2  # 将波浪号放在H上方
 55
 56    draw.text((wave_x, wave_y), wave, fill=(255, 255, 255), font=wave_font)
 57
 58    # 对小尺寸图标进行锐化
 59    if size <= 32:
 60        from PIL import ImageEnhance
 61        enhancer = ImageEnhance.Sharpness(image)
 62        image = enhancer.enhance(1.5)
 63
 64    return image
 65
 66
 67def save_ico(images, sizes, output_path):
 68    """保存为 ICO 文件"""
 69    # ICO 文件头
 70    header = struct.pack('<HHH', 0, 1, len(sizes))
 71
 72    # 目录项
 73    directory = b''
 74    offset = 6 + len(sizes) * 16  # 6 是文件头大小,16 是每个目录项的大小
 75
 76    # 图像数据
 77    image_data = b''
 78
 79    for i, (img, size) in enumerate(zip(images, sizes)):
 80        # 将图像转换为 PNG 格式
 81        png_data = io.BytesIO()
 82        img.save(png_data, format='PNG')
 83        png_bytes = png_data.getvalue()
 84
 85        # 计算 PNG 数据大小
 86        png_size = len(png_bytes)
 87
 88        # 如果尺寸大于 255,在目录项中使用 0
 89        width = size if size <= 255 else 0
 90        height = size if size <= 255 else 0
 91
 92        # 添加目录项
 93        directory += struct.pack('<BBBBHHII',
 94                                 width,  # 宽度
 95                                 height,  # 高度
 96                                 0,     # 颜色数(0 表示 256 色)
 97                                 0,     # 保留
 98                                 1,     # 颜色平面数
 99                                 32,    # 每像素位数
100                                 png_size,  # 图像数据大小
101                                 offset   # 图像数据偏移
102                                 )
103
104        # 添加图像数据
105        image_data += png_bytes
106        offset += png_size
107
108    # 写入文件
109    with open(output_path, 'wb') as f:
110        f.write(header)
111        f.write(directory)
112        f.write(image_data)
113
114
115def main():
116    print("开始生成图标...")
117
118    # Windows需要的所有图标尺寸
119    sizes = [16, 20, 24, 32, 40, 48, 64, 96, 128, 256, 512]
120    images = []
121
122    # 为每个尺寸创建优化的图标
123    for size in sizes:
124        print(f"生成 {size}x{size} 图标...")
125        image = create_icon_for_size(size)
126        images.append(image)
127
128    # 确保输出目录存在
129    output_dir = Path(__file__).parent.parent / "icons"
130    output_dir.mkdir(exist_ok=True)
131    output_path = output_dir / "app.ico"
132
133    # 保存为ICO文件
134    print("保存ICO文件...")
135    save_ico(images, sizes, output_path)
136
137    print(f"图标文件已生成:{output_path}")
138
139
140if __name__ == "__main__":
141    main()
真的还挺好看的。
主程序
整个程序简直是乏善可陈。
首先是我们的清单,用一个结构体来表示,是一个动态的列表,这里也不涉及到增加,就是在启动的过程中从text.rs中读取。然后就是当前的步骤,用当前的步骤来更新另外一个字段,就是记录当前工作的。这里有一个逻辑:checklist中只能选取勾选当前工作以及之前的选项。如果是当前可选的,那就是完成一项工作,如果是以前已经完成的,就会把所有剩下的工作都标记为未完成。
 1struct PostChecklist {
 2    steps: Vec<(String, bool)>,
 3    current_step: usize, // 当前可操作的步骤
 4}
 5
 6impl Default for PostChecklist {
 7    fn default() -> Self {
 8        Self {
 9            steps: text::CHECKLIST_ITEMS
10                .iter()
11                .map(|&item| (item.to_string(), false))
12                .collect(),
13            current_step: 0,
14        }
15    }
16}
17
18impl PostChecklist {
19    fn update_current_step(&mut self) {
20        // 找到第一个未完成的步骤
21        self.current_step = self
22            .steps
23            .iter()
24            .position(|(_, checked)| !checked)
25            .unwrap_or(self.steps.len());
26    }
27}
主程序的逻辑也很简单,就是为清单结构体实现一个eframe::App,提供一个update函数。
 1impl eframe::App for PostChecklist {
 2    fn update(&mut self, ctx: &egui::Context, _frame: &mut eframe::Frame) {
 3        egui::CentralPanel::default().show(ctx, |ui| {
 4            ui.heading(text::HEADING);
 5            ui.separator();
 6
 7            let mut step_changed = false;
 8            let mut uncheck_from = None;
 9
10            for i in 0..self.steps.len() {
11                let can_check = i <= self.current_step;
12                let step_text = self.steps[i].0.clone();
13                let mut checked = self.steps[i].1;
14
15                if can_check {
16                    if ui.checkbox(&mut checked, step_text.as_str()).changed() {
17                        self.steps[i].1 = checked;
18                        step_changed = true;
19                        if !checked {
20                            uncheck_from = Some(i + 1);
21                        }
22                    }
23                } else {
24                    ui.add_enabled(false, egui::Checkbox::new(&mut checked, step_text.as_str()));
25                }
26            }
27
28            // 处理状态变化
29            if let Some(from_step) = uncheck_from {
30                for i in from_step..self.steps.len() {
31                    self.steps[i].1 = false;
32                }
33            }
34            if step_changed {
35                self.update_current_step();
36            }
37
38            ui.separator();
39            if ui.button(text::RESET_BUTTON).clicked() {
40                for step in &mut self.steps {
41                    step.1 = false;
42                }
43                self.current_step = 0;
44            }
45        });
46    }
47}
在这个函数中,就是设置ui的布局和行为,关键的代码在:
1egui::CentralPanel::default().show(ctx, |ui| {
2    ui.heading("GitHub Pages Checklist");
3    ui.separator();
4    ui.checkbox(&mut checklist.steps[checklist.current_step].1, "完成");
5    // ……
6});
这个函数的帮助在:struct CentralPanel.show,最后一个参数用的是一个匿名方法来实现,是要给&mut Ui对象,形参名字为ui。调用Ui所实现的函数,就能完成对UI的更行。这个函数中,我们首先设置了一个标题,然后设置了一个分隔符,然后设置了一个复选框,复选框的值是清单结构体中的当前步骤的完成状态。
相当于是,egui的主线程定时在一定的上下文下调用这个update函数,绘制和更新UI。
主函数中,则主要是设置我们想要的窗口属性,什么一直在最前、窗口尺寸、是否能调整大小……最终调用eframe::run_native来启动程序。
  1#![cfg_attr(not(debug_assertions), windows_subsystem = "windows")] // 在 release 模式下使用 windows subsystem
  2
  3use eframe::egui;
  4use egui::IconData;
  5mod text;
  6
  7#[cfg(debug_assertions)]
  8fn log(msg: &str) {
  9    println!("{}", msg);
 10}
 11
 12#[cfg(not(debug_assertions))]
 13fn log(_msg: &str) {}
 14
 15struct PostChecklist {
 16    steps: Vec<(String, bool)>,
 17    current_step: usize, // 当前可操作的步骤
 18}
 19
 20impl Default for PostChecklist {
 21    fn default() -> Self {
 22        Self {
 23            steps: text::CHECKLIST_ITEMS
 24                .iter()
 25                .map(|&item| (item.to_string(), false))
 26                .collect(),
 27            current_step: 0,
 28        }
 29    }
 30}
 31
 32impl PostChecklist {
 33    fn update_current_step(&mut self) {
 34        // 找到第一个未完成的步骤
 35        self.current_step = self
 36            .steps
 37            .iter()
 38            .position(|(_, checked)| !checked)
 39            .unwrap_or(self.steps.len());
 40    }
 41
 42    // fn uncheck_following_steps(&mut self, from_step: usize) {
 43    //     // 取消从指定步骤开始的所有后续步骤
 44    //     for (_, checked) in self.steps.iter_mut().skip(from_step) {
 45    //         *checked = false;
 46    //     }
 47    //     // 更新当前步骤
 48    //     self.update_current_step();
 49    // }
 50}
 51
 52impl eframe::App for PostChecklist {
 53    fn update(&mut self, ctx: &egui::Context, _frame: &mut eframe::Frame) {
 54        egui::CentralPanel::default().show(ctx, |ui| {
 55            ui.heading(text::HEADING);
 56            ui.separator();
 57
 58            let mut step_changed = false;
 59            let mut uncheck_from = None;
 60
 61            for i in 0..self.steps.len() {
 62                let can_check = i <= self.current_step;
 63                let step_text = self.steps[i].0.clone();
 64                let mut checked = self.steps[i].1;
 65
 66                if can_check {
 67                    if ui.checkbox(&mut checked, step_text.as_str()).changed() {
 68                        self.steps[i].1 = checked;
 69                        step_changed = true;
 70                        if !checked {
 71                            uncheck_from = Some(i + 1);
 72                        }
 73                    }
 74                } else {
 75                    ui.add_enabled(false, egui::Checkbox::new(&mut checked, step_text.as_str()));
 76                }
 77            }
 78
 79            // 处理状态变化
 80            if let Some(from_step) = uncheck_from {
 81                for i in from_step..self.steps.len() {
 82                    self.steps[i].1 = false;
 83                }
 84            }
 85            if step_changed {
 86                self.update_current_step();
 87            }
 88
 89            ui.separator();
 90            if ui.button(text::RESET_BUTTON).clicked() {
 91                for step in &mut self.steps {
 92                    step.1 = false;
 93                }
 94                self.current_step = 0;
 95            }
 96        });
 97    }
 98}
 99
100fn main() -> Result<(), eframe::Error> {
101    let options = eframe::NativeOptions {
102        viewport: egui::ViewportBuilder::default()
103            .with_inner_size([600.0, 500.0])
104            .with_resizable(false) // 设置窗口不可调整大小
105            .with_title(text::WINDOW_TITLE)
106            .with_always_on_top()
107            .with_icon(load_icon()),
108        ..Default::default()
109    };
110
111    eframe::run_native(
112        text::WINDOW_TITLE,
113        options,
114        Box::new(|cc| {
115            // 设置中文字体
116            let mut fonts = egui::FontDefinitions::default();
117
118            // 添加自定义字体
119            fonts.font_data.insert(
120                "custom_font".to_owned(),
121                egui::FontData::from_static(include_bytes!("../fonts/custom_font.ttf")),
122            );
123
124            // 将字体添加到所有字体族
125            fonts
126                .families
127                .get_mut(&egui::FontFamily::Proportional)
128                .unwrap()
129                .insert(0, "custom_font".to_owned());
130
131            fonts
132                .families
133                .get_mut(&egui::FontFamily::Monospace)
134                .unwrap()
135                .insert(0, "custom_font".to_owned());
136
137            // 应用字体设置
138            cc.egui_ctx.set_fonts(fonts);
139
140            // 设置界面缩放
141            cc.egui_ctx.set_pixels_per_point(1.5);
142
143            Box::new(PostChecklist::default())
144        }),
145    )
146}
147
148fn load_icon() -> IconData {
149    log("尝试加载嵌入的图标");
150
151    // 嵌入图标文件
152    let icon_bytes = include_bytes!("../icons/app.ico");
153
154    match image::load_from_memory(icon_bytes) {
155        Ok(image) => {
156            log("成功加载嵌入的图标");
157            // 将图像调整为32x32大小,这是Windows图标的标准尺寸
158            let image = image.resize_exact(32, 32, image::imageops::FilterType::Lanczos3);
159            let rgba = image.to_rgba8();
160            let (width, height) = rgba.dimensions();
161            log(&format!("图标尺寸: {}x{}", width, height));
162
163            IconData {
164                rgba: rgba.into_raw(),
165                width: width as _,
166                height: height as _,
167            }
168        }
169        Err(e) => {
170            log(&format!("错误:无法加载嵌入的图标: {}", e));
171            default_icon()
172        }
173    }
174}
175
176fn default_icon() -> IconData {
177    log("使用默认图标");
178    // 创建一个16x16的默认图标,使用蓝色而不是白色
179    let size: u32 = 16;
180    let color = vec![0u8, 102, 204, 255];
181    let mut rgba = Vec::with_capacity((size * size * 4) as usize);
182    for _ in 0..((size * size) as usize) {
183        rgba.extend_from_slice(&color);
184    }
185    IconData {
186        rgba,
187        width: size,
188        height: size,
189    }
190}
Windows打包
这个程序还有一点点复杂的就是windows下打包成Windows subsystem的exe。这里就不涉及技术细节了,我可以不是自己不懂……哈哈哈哈哈
 1#[cfg(windows)]
 2fn main() {
 3    use std::io::Write;
 4    let mut res = winres::WindowsResource::new();
 5
 6    // 设置图标
 7    res.set_icon("icons/app.ico");
 8
 9    // 设置清单文件
10    let manifest = r#"<?xml version="1.0" encoding="UTF-8" standalone="yes"?>
11<assembly xmlns="urn:schemas-microsoft-com:asm.v1" manifestVersion="1.0">
12    <trustInfo xmlns="urn:schemas-microsoft-com:asm.v3">
13        <security>
14            <requestedPrivileges>
15                <requestedExecutionLevel level="asInvoker" uiAccess="false"/>
16            </requestedPrivileges>
17        </security>
18    </trustInfo>
19</assembly>"#;
20
21    let manifest_path = "target/app.manifest";
22    std::fs::create_dir_all("target").unwrap();
23    let mut manifest_file = std::fs::File::create(manifest_path).unwrap();
24    manifest_file.write_all(manifest.as_bytes()).unwrap();
25
26    res.set_manifest_file(manifest_path);
27
28    // 设置应用程序版本信息
29    res.set_version_info(winres::VersionInfo::PRODUCTVERSION, 0x00010000);
30    res.set_version_info(winres::VersionInfo::FILEVERSION, 0x00010000);
31    res.set("ProductName", "Hugo Post Manifesto");
32    res.set("FileDescription", "Hugo Post Manifesto");
33    res.set("LegalCopyright", "Copyright (c) 2024");
34
35    if let Err(e) = res.compile() {
36        eprintln!("Error: {}", e);
37        std::process::exit(1);
38    }
39}
40
41#[cfg(not(windows))]
42fn main() {}
总结
全部工程需要的文件:
这些文件都可以在Github仓库中找到。
文章标签
|-->rust |-->egui |-->checklist |-->github pages |-->rust-lang |-->清单革命 |-->git branch |-->python |-->icon |-->font |-->font-cutter |-->字体裁剪
- 本站总访问量:loading次
- 本站总访客数:loading人
- 可通过邮件联系作者:Email大福
- 也可以访问技术博客:大福是小强
- 也可以在知乎搞抽象:知乎-大福
- Comments, requests, and/or opinions go to: Github Repository