CAD Editor in Matlab中实现一个CADQuery编辑器
陈轸曰:“令尹贵矣,王非置两令尹也。臣窃为公譬可也?楚有祠者,赐其舍人卮酒。
舍人相谓曰:‘数人饮之不足,一人饮之有余。请画地为蛇,先成者饮酒。’
一人蛇先成,引酒且饮之,乃左手持卮,右手画蛇,曰:‘吾能为之足。’
未成,人之蛇成,夺其卮曰:‘蛇固无足,子安能为之足?’遂饮其酒。
为蛇足者,终亡其酒。今君相楚而攻魏,破军杀将得八城,不弱兵,欲攻齐。
齐畏公甚,公以是为名居足矣。官之上非可重也。
战无不胜,而不知止者,身且死,爵且后归,犹为蛇足也。”昭合以为然,解军而去。
                                                 ---西汉·《战国策·齐策二》
画蛇著足无处用,两鬓雪白趋埃尘。唐·韩愈《感春》

CAD编辑器的构想
反正没有头发,也不怕两鬓雪白趋埃尘,那就画蛇著足吧。
CADQuery是一个Python工具包,用于进行CAD几何建模,是开源工具OpenCascade的一个封装。
我们在Matlab中进行FEM分析,通常会用以下工具来进行建模:
其实,主流的CAD软件系统本身百花齐放,好用的很多,就比如CADQuery,可用性就非常好。本着画蛇添足的精神,我们可以在Matlab中实现一个CADQuery编辑器,用于产生stl模型,并在GUI上显示几何体。
系统功能:
- 输入代码,生成stl模型
- 显示stl模型
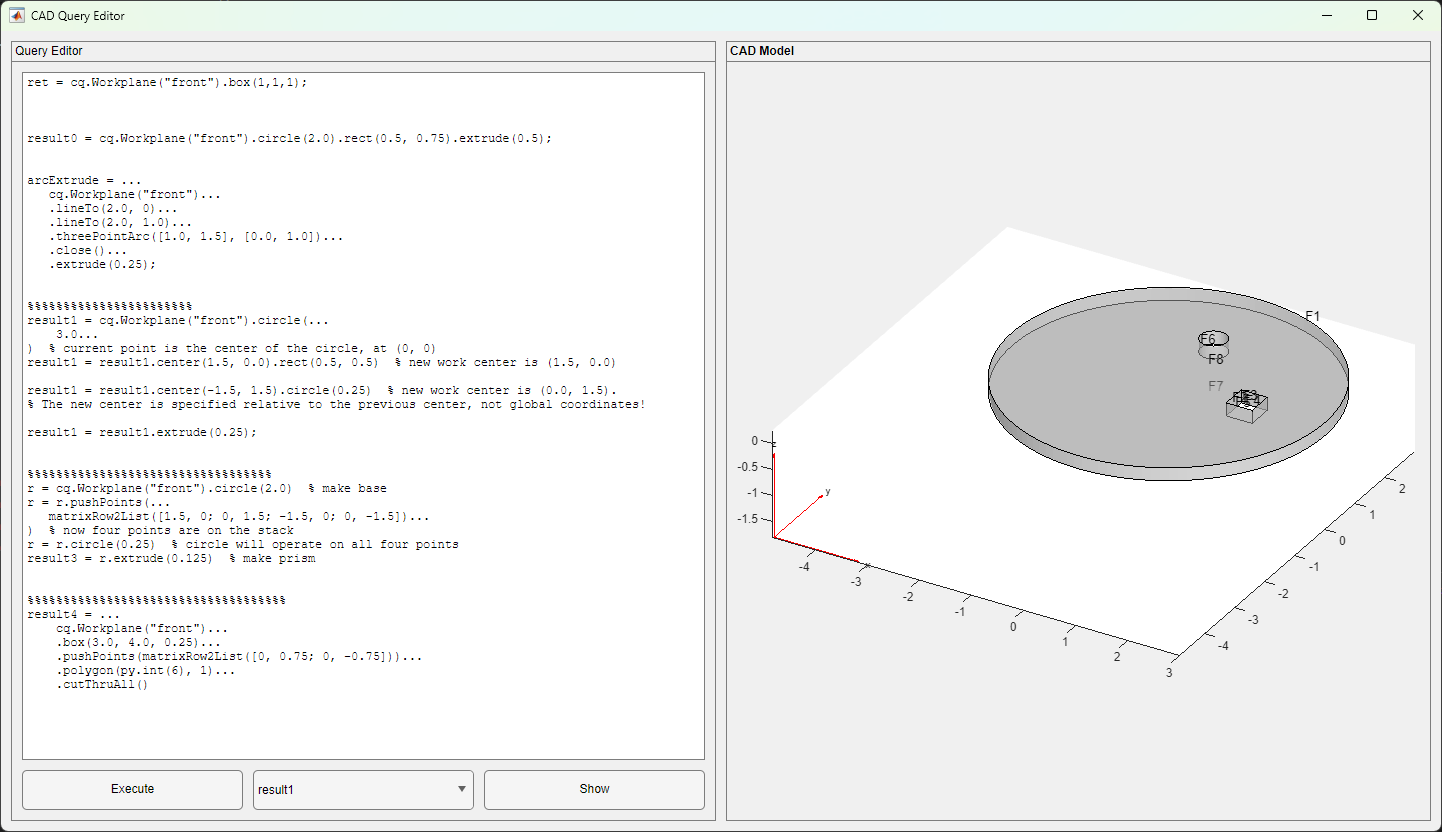
大概设计一个GUI就是下面这个子:
实现的技术
Matlab调用CadQuery
从2014b版本开始,Matlab支持调用Python。在Matlab中调用Python需要先安装Python,然后在Matlab中设置Python的路径。
在Matlab中调用Python之前,应该设置Python的路径,在2019不之前,可以使用pyversion函数设置Python的路径,如下所示:
1pyversion('C:\Python27\python.exe');
在2019b版本之后,可以使用pyenv函数设置Python的路径,如下所示:
1pyenv('executable','C:\Python27\python.exe');
在R2023b中,则必须调用:
1pyenv('Version', "C:\ProgramData\miniconda3\python.exe")
或者
1pyenv(Version="C:\ProgramData\miniconda3\python.exe")
请根据自己的版本,`help pyversion`,`help pyenv`,`doc pyversion`,`doc pyenv`灵活处理。
Matlab会自动记住上次设置的pyenv。不用每次都设置Python的路径。
但是,每次启动Python(调用Python的函数)之后,就不能更改Python的路径了,必须重启Matlab才能更改Python的路径。
此外,还有一个参数executionMode可以设置。executionMode有两个值,inprocess和OutOfProcess,inprocess表示在Matlab进程中运行Python,OutOfProcess表示在独立的Python进程中运行Python。默认值为inprocess。
对于性能关键的应用,建议使用InProcess模式。当需要三方库来运行Python代码时(Python库依赖的库与Matlab不兼容),或者需要调试的时候,可以使用OutOfProcess模式。
当按照如上的方式设置好Python的路径之后,就可以在Matlab中调用Python了。在Matlab中调用Python的方式有两种:
- 使用
py函数; - 使用
py.importlib.import_module函数。
py函数可以直接调用Python的函数,py.importlib.import_module函数可以导入Python的模块。
使用py函数调用Python的函数时,可以直接调用Python的函数,如下所示:
1py.math.sin(3.14)
2 ans =
3
4    0.0016
还比如,可以调用Python的numpy库,如下所示:
1py.numpy.array([1,2,3])
使用py.importlib.import_module函数导入Python的模块,然后调用Python的函数,如下所示:
1np = py.importlib.import_module('numpy');
2np.array([1,2,3])
当然这两种方法都是可以的。使用py函数调用Python的函数时,需要输入完整的Python函数名,而使用py.importlib.import_module函数导入Python的模块,然后调用Python的函数时,只需要输入Python函数名即可。
这里需要注意的是,python的常用类型在matlab中是不支持的,比如list、dict、tuple等。在matlab中,list、dict、tuple等都是py.list、py.dict、py.tuple等类型。哪怕是整数、浮点数等,也是py.int、py.float等类型。
可以用class函数查看python的类型,如下所示:
1class(py.list([1,2,3]))
用detail函数查看python对象的详细信息,包括字段、方法、事件、父类(Matlab中显示为超类)这些。
总的来说,在Matlab中调用Python的函数还是有点憋屈的,不过也能用。
GUI程序开发
关于这个议题,已经写了很多了,可以参考GUI标签的所有文章系列的文章。
这里唯一需要增加的就是,需要构造一个坐标系来调用pdegplot函数,来显示stl模型。
这里,如下代码导入stl模型,并显示:
1gm = importGeometry('model.stl');
2pdegplot(ax, gm, 'FaceAlpha', 0.5, 'FaceLabels', 'on');
这里的ax是一个坐标系,可以用uiaxes函数构造,如下所示:
1ax = uiaxes(gridLayout);
2ax.XLabel.String = 'X';
3ax.YLabel.String = 'Y';
4ax.ZLabel.String = 'Z';
这里注意的是,不是用xlabel、ylabel、zlabel函数,而是用XLabel、YLabel、ZLabel属性的String参数来设置坐标标签。
工作空间和变量类型
在设计实现上面的这个CADQuery编辑器的时候,考虑到如何把脚本运行的结果(在cadquery中描述为Workplane)保存下来,以便于后续的操作。
最简单的就是把这个变量输出为一个stl文件,然后再导入到Matlab中进行显示。
这里就有一个问题,如何获得脚本中产生的Workplane变量?
最简单的考虑,就是下面这个算法:
- 找到所有的变量(在哪找?)
- 看看这个变量是不是Workplane类型(怎么看?)
- 如果是Workplane类型,就把名字记下来
- 当需要显示某个Workplane的时候,就把这个Workplane变量导出为stl文件,然后导入到Matlab中显示。
这里就有一个问题,如何找到所有的变量?变量的信息保存在哪里?Matlab如何管理变量?
这里先歪个楼,看看Matlab中函数闭包的问题。
匿名函数闭包
例如,我们定义一个匿名函数,如下所示:
1f = @(x) x^2+y;
如果我们调用这个函数,如下所示:
1>> f(10)
2函数或变量 'y' 无法识别。
3出错 @(x)x^2+y
这里就会报错,因为y这个变量没有定义。比如,我们再定义这个变量:
1>> y = 12
2y =
3    12
4>> f(10)
5函数或变量 'y' 无法识别。
6出错 @(x)x^2+y
依然不行。这里的y是一个自由变量,这个变量的值是在函数定义的时候确定的,而不是在函数调用的时候确定的。必须这样:
1>> y = 12; f = @(x)x^2 + y;
2>> f(2)
3ans =
4    16
我们可以通过functions函数来查看这个函数的信息,如下所示:
1>> functions(f)
2ans =
3  包含以下字段的 struct:
4
5            function: '@(x)x^2+y'
6                type: 'anonymous'
7                file: ''
8           workspace: {[1×1 struct]}
9    within_file_path: ''
这里面有一个workspace字段,这个字段是一个结构体,这个结构体中保存了这个函数的自由变量的值,如下所示:
1>> functions(f).workspace{1}
2ans =
3  struct with fields:
4
5    y: 12
大概说起来,工作空间(workspace)就相当于是一个描述代码运行环境的结构体,这个结构体中保存了所有的变量的值,这些变量的值是在代码运行的时候确定的。
这在其它程序设计语言中,大概就相当于是闭包(closure)。
base和caller工作空间
在Matlab脚本和函数中,就定义了两个特殊的工作空间,base和caller工作空间。
base工作空间是Matlab的基础工作空间,这个工作空间中保存了所有的全局变量的值;caller工作空间是调用函数的工作空间,这个工作空间中保存了所有的局部变量的值。
我们可以通过evalin函数来查看这两个工作空间的变量,如下所示:
 1>> variables = evalin('base', 'whos')
 2variables =
 3  包含以下字段的 24×1 struct 数组:
 4    name
 5    size
 6    bytes
 7    class
 8    global
 9    sparse
10    complex
11    nesting
12    persistent
这会得到一个结构数组,当用who代替whos时,会得到一个字符串数组,这个字符串数组中保存了所有的变量的名字。这就实际上的提供了一个方法,可以在不同的地方直接操作一个共享的工作空间。
变量类型
Matlab中变量类型可以用class函数来查看,如下所示:
1>> class(1)
2ans =
3    'double'
4>> class('hello')
5ans =
6    'char'
7>> class([1,2,3])
8ans =
9    'double'
通过这个函数与strcmp函数,可以判断一个变量是不是某种类型,如下所示:
1>> strcmp(class(1), 'double')
2ans =
3  logical
4   1
5>> strcmp(class(1), 'char')
6ans =
7  logical
8   0
代码
下面给出实现这个CADQuery编辑器的代码。
GUI
  1function fig = cadqeuryEditor(scriptFileName)
  2arguments
  3    scriptFileName (1,1) string = "mycadquery.cds"
  4end
  5
  6
  7%% prepare for cadquery, makesure the cadquery is installed
  8% consier to install the cadquery by using the following command
  9% !pip install cadquery
 10evalin('base', "cq = py.importlib.import_module('cadquery');");
 11
 12%% create a uifigure
 13fig = uifigure('Name','CAD Query Editor', ...
 14    'NumberTitle','off'    );
 15% moving the figure to the center of the screen
 16fig.Position = [0,0, 1440, 800];
 17movegui(fig, 'center');
 18fig.Visible = 'off';
 19
 20% create a grid layout
 21g = uigridlayout(fig, [1 2], "ColumnWidth", {'1x', '1x'});
 22
 23%% left panel code editor
 24leftPanel = uipanel(g);
 25leftPanel.Title = 'Query Editor';
 26leftPanel.Layout.Row = 1;
 27leftPanel.Layout.Column = 1;
 28
 29% create a grid layout for the left panel
 30% button row, fixed height
 31leftgrid = uigridlayout(leftPanel, [2 3], "RowHeight", {'1x', 40});
 32
 33% create a code editor
 34code = uitextarea(leftgrid, ...
 35    'FontName', "Monospaced", ...
 36    'FontSize', 12, ...
 37    'Value', 'ret = cq.Workplane("front").box(1,1,1)');
 38code.Layout.Row = 1;
 39% span 3 columns
 40code.Layout.Column = [1,  3];
 41
 42% call loading file to code
 43laodingFileToCode(code, scriptFileName);
 44
 45% set the close request function to dump the code to a file
 46fig.CloseRequestFcn = @(~, ~)dumpCodeToFile(code, scriptFileName);
 47
 48% add selections for workplane object
 49lst = uidropdown(leftgrid);
 50lst.Items = workPlanesInBase();
 51lst.Layout.Row=2;
 52lst.Layout.Column = 2;
 53
 54
 55% button do calculation and update lst
 56btnExec = uibutton(leftgrid, 'Text', 'Execute',...
 57    'ButtonPushedFcn', @(~, ~)executeCode(code, lst));
 58btnExec.Layout.Row = 2;
 59btnExec.Layout.Column = 1;
 60
 61%% right panel axes to show the CAD model
 62rightPanel = uipanel(g);
 63rightPanel.Title = 'CAD Model';
 64rightPanel.FontSize = 12;
 65rightPanel.FontWeight = 'bold';
 66
 67rightPanel.Layout.Row = 1;
 68rightPanel.Layout.Column = 2;
 69
 70rightgrid = uigridlayout(rightPanel, [1,1]);
 71
 72% add a axes to show the CAD model
 73ax = uiaxes(rightgrid);
 74ax.XLabel.String = 'X';
 75ax.YLabel.String = 'Y';
 76ax.ZLabel.String = 'Z';
 77
 78% create a button to execute the code
 79btn = uibutton(leftgrid, 'Text', 'Show', ...
 80    'ButtonPushedFcn', @(src, evt)insert_pdegplot(lst, ax));
 81btn.Layout.Row = 2;
 82btn.Layout.Column = 3;
 83
 84lst.ValueChangedFcn = @(src, evt)insert_pdegplot(lst, ax);
 85insert_pdegplot(lst, ax);
 86
 87fig.Visible = 'on';
 88end
 89%%%%%%%%%%%%%%%%%%%%%%%%%%%%%%%%%%%%%%%%%%%%%%%%%%%%%%%%%%%%%%
 90% local functions
 91function laodingFileToCode(codeWidget, fn)
 92% if the file does not exist, return
 93if ~exist(fn, 'file')
 94    return;
 95end
 96% read the file content to the code widget
 97fid = fopen(fn, 'r');
 98code = fread(fid, '*char')';
 99fclose(fid);
100codeWidget.Value = code;
101end
102
103function dumpCodeToFile(codeWidget, fn)
104% if codeWidet has nothing than blank line return
105if isempty(codeWidget.Value)
106    return;
107end
108
109% write the code in the code widget to a file
110fid = fopen(fn, 'w');
111fprintf(fid, '%s', strjoin(codeWidget.Value, newline));
112fclose(fid);
113
114% close the figure
115delete(gcbf);
116end
117
118
119
120function insert_pdegplot(wpLst, ax)
121% get the workplane object from the list
122% write the workplane object to a temp file
123% import the geometry from the file
124wpName = wpLst.Value;
125fn = [tempname, '.stl'];
126cmd = sprintf("%s.val().exportStl('%s');", wpName, fn);
127evalin('base', cmd);
128
129cla(ax);
130gm = importGeometry(fn);
131pdegplot(ax, gm, 'FaceLabels', 'on', 'FaceAlpha', 0.5);
132end
133
134function wps = workPlanesInBase()
135vars = evalin('base', 'whos');
136wp = vars(arrayfun(@(s)strcmp(s.class, 'py.cadquery.cq.Workplane'), vars));
137wps = {wp.name};
138end
139
140function executeCode(codeWidget, lst)
141% execute the code in current workspace
142
143codeStr = codeWidget.Value;
144wp0 = workPlanesInBase();
145% combine cell array to a string
146codeStr = strjoin(codeStr, newline);
147evalin('base', sprintf("%s;", codeStr));
148
149wp = workPlanesInBase();
150
151if length(wp) == length(wp0)
152    fprintf("No new workplane object added\n");
153else
154    % update lst
155    lst.Items = wp;
156end
157end
CADQuery代码
这里还有几个实例代码,用于测试CADQuery的功能。
 1ret = cq.Workplane("front").box(1,1,1);
 2
 3
 4
 5result0 = cq.Workplane("front").circle(2.0).rect(0.5, 0.75).extrude(0.5);
 6
 7
 8arcExtrude = ...
 9   cq.Workplane("front")...
10   .lineTo(2.0, 0)...
11   .lineTo(2.0, 1.0)...
12   .threePointArc([1.0, 1.5], [0.0, 1.0])...
13   .close()...
14   .extrude(0.25);
15
16
17%%%%%%%%%%%%%%%%%%%%%%%
18result1 = cq.Workplane("front").circle(...
19    3.0...
20)  % current point is the center of the circle, at (0, 0)
21result1 = result1.center(1.5, 0.0).rect(0.5, 0.5)  % new work center is (1.5, 0.0)
22
23result1 = result1.center(-1.5, 1.5).circle(0.25)  % new work center is (0.0, 1.5).
24% The new center is specified relative to the previous center, not global coordinates!
25
26result1 = result1.extrude(0.25);
27
28
29%%%%%%%%%%%%%%%%%%%%%%%%%%%%%%%%%%
30r = cq.Workplane("front").circle(2.0)  % make base
31r = r.pushPoints(...
32   matrixRow2List([1.5, 0; 0, 1.5; -1.5, 0; 0, -1.5])...
33)  % now four points are on the stack
34r = r.circle(0.25)  % circle will operate on all four points
35result3 = r.extrude(0.125)  % make prism
36
37
38%%%%%%%%%%%%%%%%%%%%%%%%%%%%%%%%%%%%
39result4 = ...
40    cq.Workplane("front")...
41    .box(3.0, 4.0, 0.25)...
42    .pushPoints(matrixRow2List([0, 0.75; 0, -0.75]))...
43    .polygon(py.int(6), 1)...
44    .cutThruAll()
这里面有一个常用的转换函数,就是把矩阵的行转换为Python的列表。
 1function lst = matrixRow2List(m)
 2% convert a matrix to a list of list
 3% each row of the matrix is converted to a list
 4% the list of list is returned
 5%
 6% Parameters:
 7% -----------
 8% m: matrix
 9%    the matrix to be converted
10%
11% Returns:
12% --------
13% lst: list
14%    the list of list
15%
16% Examples:
17% ---------
18% m = [1, 2, 3; 4, 5, 6];
19% lst = matrixRow2List(m);
20% disp(lst);
21%
22% m = [1, 2, 3];
23% lst = matrixRow2List(m);
24% disp(lst);
25
26row = size(m, 1);
27
28lstCell = cell(1, row);
29
30for idx = 1:row
31    lstCell{idx} = py.list(num2cell(m(idx, :)));
32end
33
34lst = py.list(lstCell);
总结
一个问题:画蛇最好增加几只脚?
文章标签
|-->matlab |-->CAD |-->CADQuery |-->FEM |-->Geometry |-->gui
- 本站总访问量:loading次
- 本站总访客数:loading人
- 可通过邮件联系作者:Email大福
- 也可以访问技术博客:大福是小强
- 也可以在知乎搞抽象:知乎-大福
- Comments, requests, and/or opinions go to: Github Repository